
How do I use the Control Jacks on the PlayAUDIO12?
There are two main functions of the Control jacks on the iConnectivity PlayAUDIO12 interface:
Arming the automatic failover functionality
Switching scenes
The Control sockets are designed to accept TRS (Tip, Ring, Sleeve) jacks:
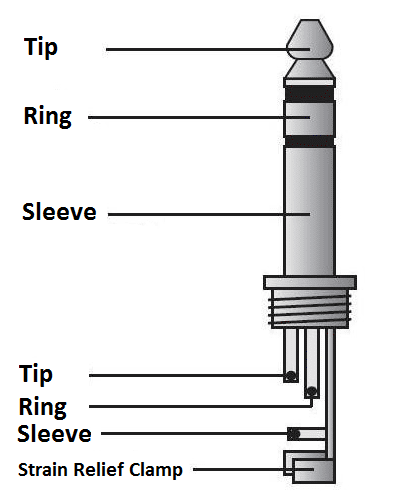
Footswitch control
You should normally be able to just attach a standard dual footswitch controller and it should work directly without any configuration required. The switch connected to the Tip arms/disarms automatic failover, while the Ring switches scenes (i.e. performs a manual failover).
We have tested and recommend the Boss FS-6 footswitch. This footswitch has an A and B button which makes things easy. To connect it run a TRS cable from the middle 1/4" socket on the FS-6 (marked A & B) to the Control In Jack on your primary PlayAUDIO12.

Connecting mulitple PlayAUDIO12 interfaces
The Control Out 1/4" jack also enables you to control multiple PlayAUDIO12s together easily. Simply run a TRS to TRS cable from the Control Out of the first PA12 to the Control In on your second PA12. You can also daisy chain these if you have several PA12s - Control Out of the second PA12 to Control in of the third PA12 and so on. This allows all of the PA12s after the first one to arm failover and switch scenes in sync with the first. This way you only need to be sending one tone from your DAW to the first PA12 in order for failover to be detected and switched for all of the PA12s in your rack.
Advanced Control Settings
Tip:
type = latching (as opposed to momentary)
function = Failover Enable
active state = Arm
inactive state = Disarm
polarity = inverted
Ring:
type = latching (as opposed to momentary)
function = Snapshot Select
active state = select snapshot #1
inactive state = select snapshot #2
polarity = inverted