
Remote Control Your Playback Rig with mioXM and PlayAUDIO1U
Remotely controlling your Playback Rig with your MIDI Controller
In live performances, the last thing an artist wants is to appear disengaged or distracted on stage. Flipping through screens or tapping away on a computer can ruin the magic of the moment. You don’t want to look like you’re checking your email on stage!. One of the most important things you can do to NOT look like you're checking your email on stage is to use a MIDI controller. If you want to take it to the next level, you can use your MIDI Controller with a mioXM and the PlayAUDIO1U to get full “remote” control of your Playback rig from on-stage. Move your Playback rig off-stage and get full control of your rig from your MIDI Controller.
Connecting your MIDI controller
Connecting your MIDI controller to the USB host port on the PlayAUDIO1U allows you to split MIDI signals to both computer A and computer B. For example, you can press play, and it will start playback on both systems, keeping your computers insync. The PlayAUDIO1U makes it insanely simple to set up and use your MIDI controller.
If you want to see how I set up and used my MIDI controller with my PlayAUDIO1U, watch this linked YouTube video to learn how to set that up!
Extending Connectivity with mioXM
It’s easy to connect your MIDI controller to your PlayAUDIO1U, but if your playback rig is off-stage, and you’re on-stage, how do you keep your MIDI controller connected? The answer is not to buy a long USB cable or a USB to ethernet extender, which might eventually stop working. Instead, purchase another fantastic piece of gear from iConnectivity called the mioXM. Click HERE to shop now!

The mioXM allows you to take your MIDI controller and have it as far away as possible, by simply connecting an ethernet cable from your mioXM to your PlayAUDIO1U. By linking the MIDI controller to the mioXM and then connecting it to the PlayAUDIO1U via ethernet, performers can position their controllers at a distance without compromising functionality. This setup not only enhances mobility on stage but also ensures a reliable connection for seamless performance transitions.
Simple Remote Setup
Setting up advanced audio rigs may seem intimidating, but it is accessible even to those of us that aren’t tech-savvy. By incorporating a network switch (like the Netgear GS308) into the setup, you can easily configure the MIDI controller, mioXM, and PlayAUDIO1U to work in harmony. From assigning host ports to routing MIDI signals, every step is designed to be user-friendly.
Step-by-Step Guide to Setup:
Connect Devices:
Connect your PlayAUDIO1U to both your A and B computers using a USB-C cable.

Use a network switch to network your computers together. Connect your Playback computers to the network switch using two ethernet cables. Connect an ethernet cable from the PlayAUDIO1U to the network switch as well. Finally, patch in the mioXM by connecting an ethernet cable from the network switch to the ethernet connection on your mioXM.
Configure mioXM: Connect your MIDI controller to the USB host port on the mioXM.

Download Auracle for X-Series and navigate to the “USB Host Reservation” page to choose your MIDI Controller and link it to a host port. In the example below, I’m choosing my MIDI controller to link it to HST 1.

RTP/Ethernet MIDI setup

In Auracle for X-Series, click on RTP/Network MIDI on your mioXM and copy the name of an open RTP port. In this example above, I’m choosing RTP 1.
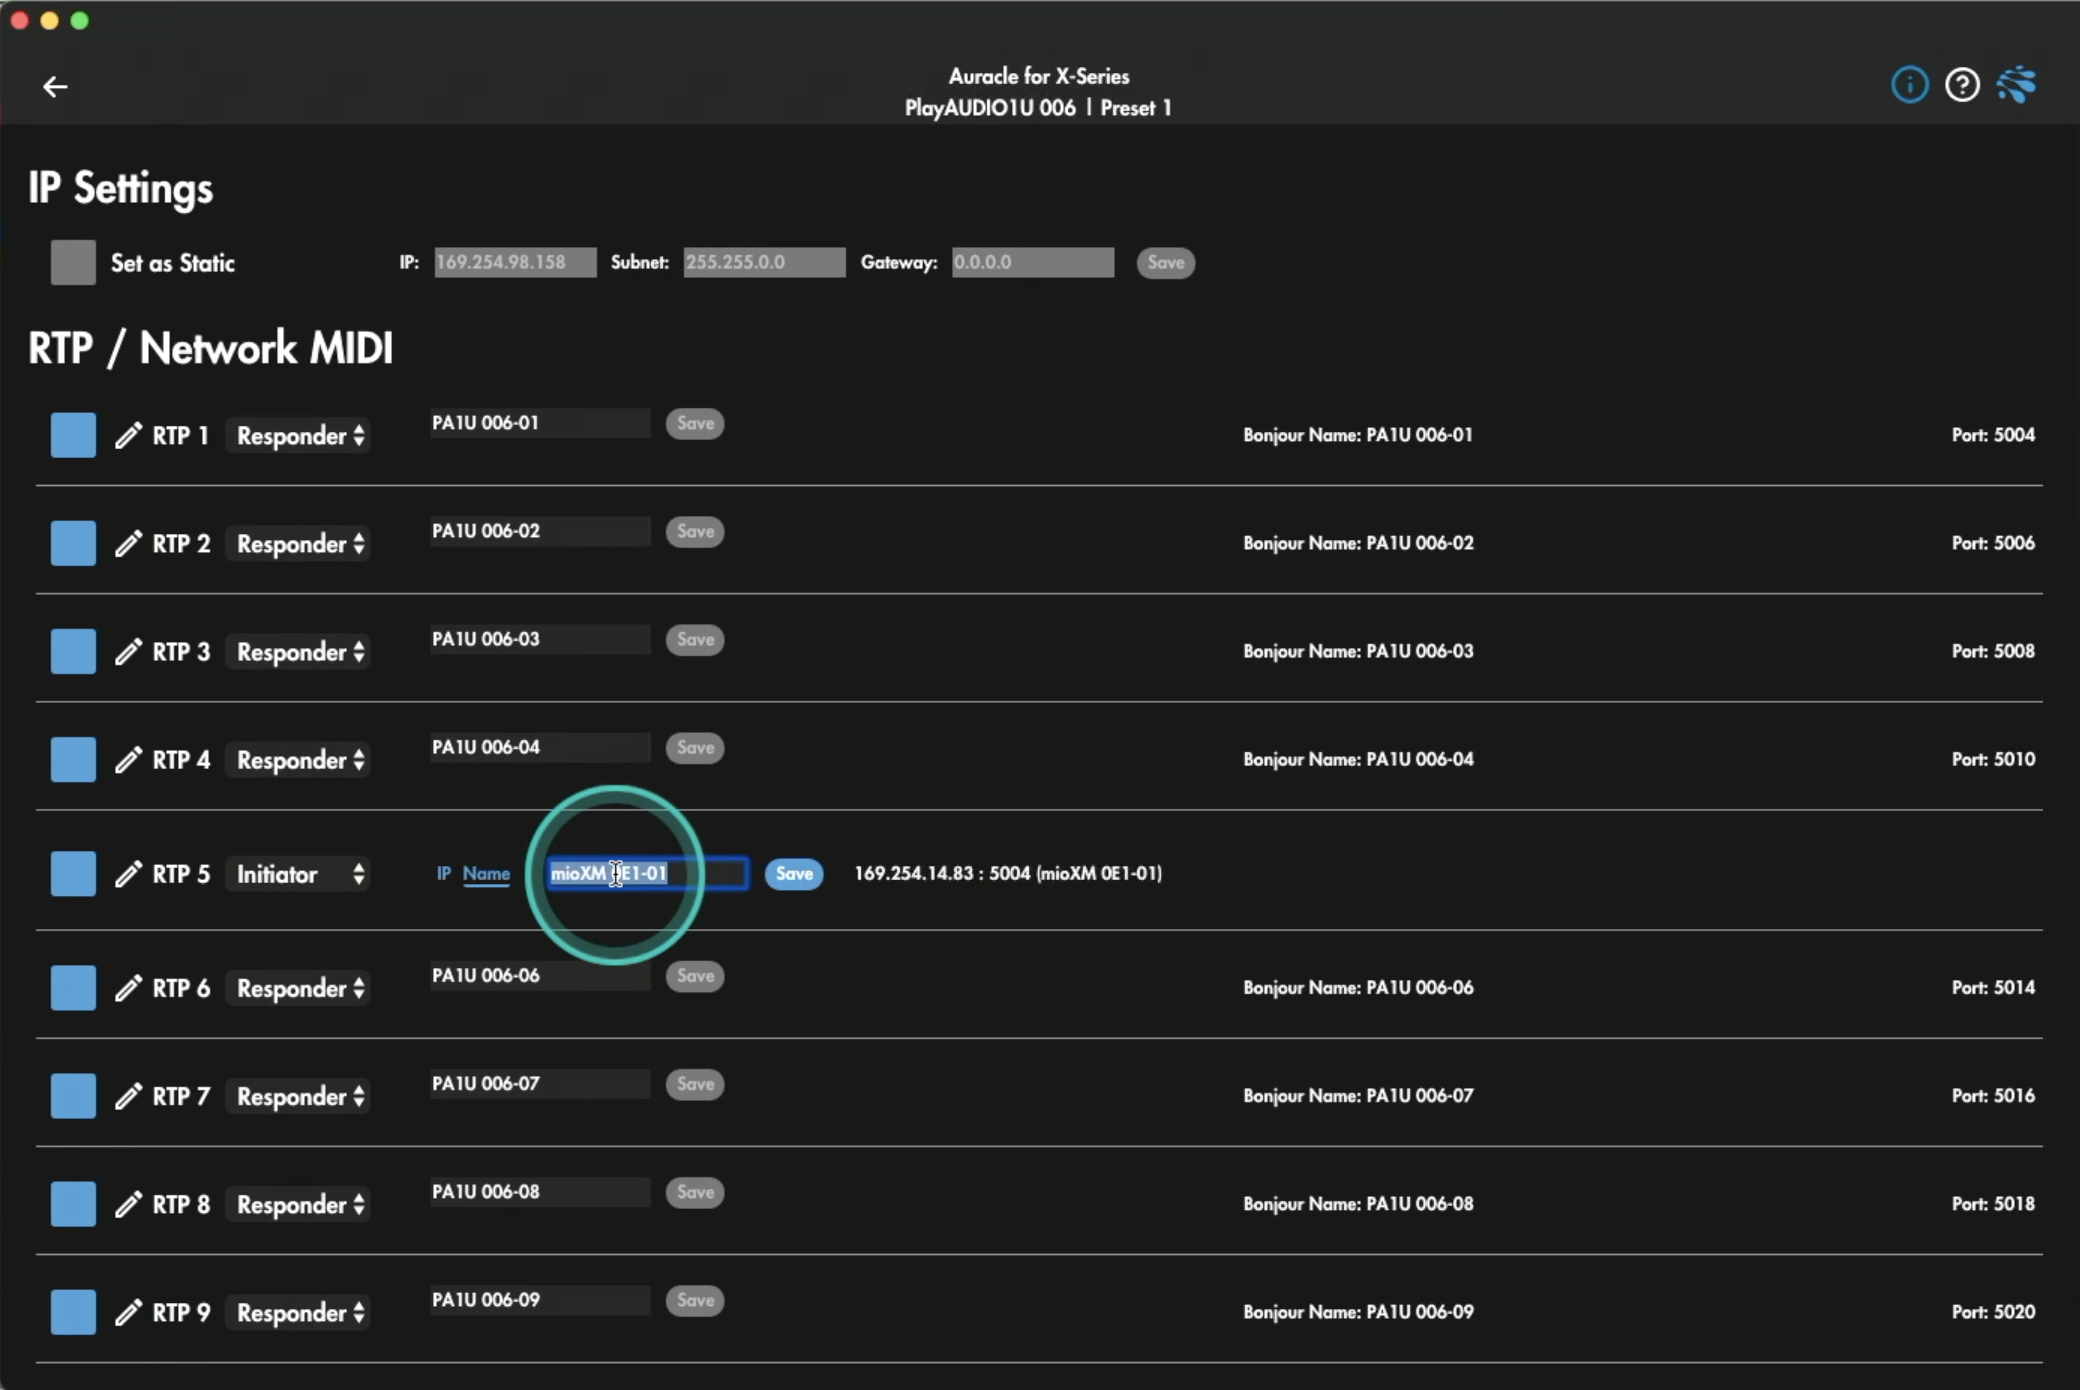
Navigate to RTP/Network MIDI settings for your PlayAUDIO1U. Choose RTP 5 and change from Responder to Initiator. Paste in the name of the RTP port from your mioXM in the name field. You’ll almost instantly see a connection made from the PlayAUDIO1U to the mioXM.
Enable in DAW:
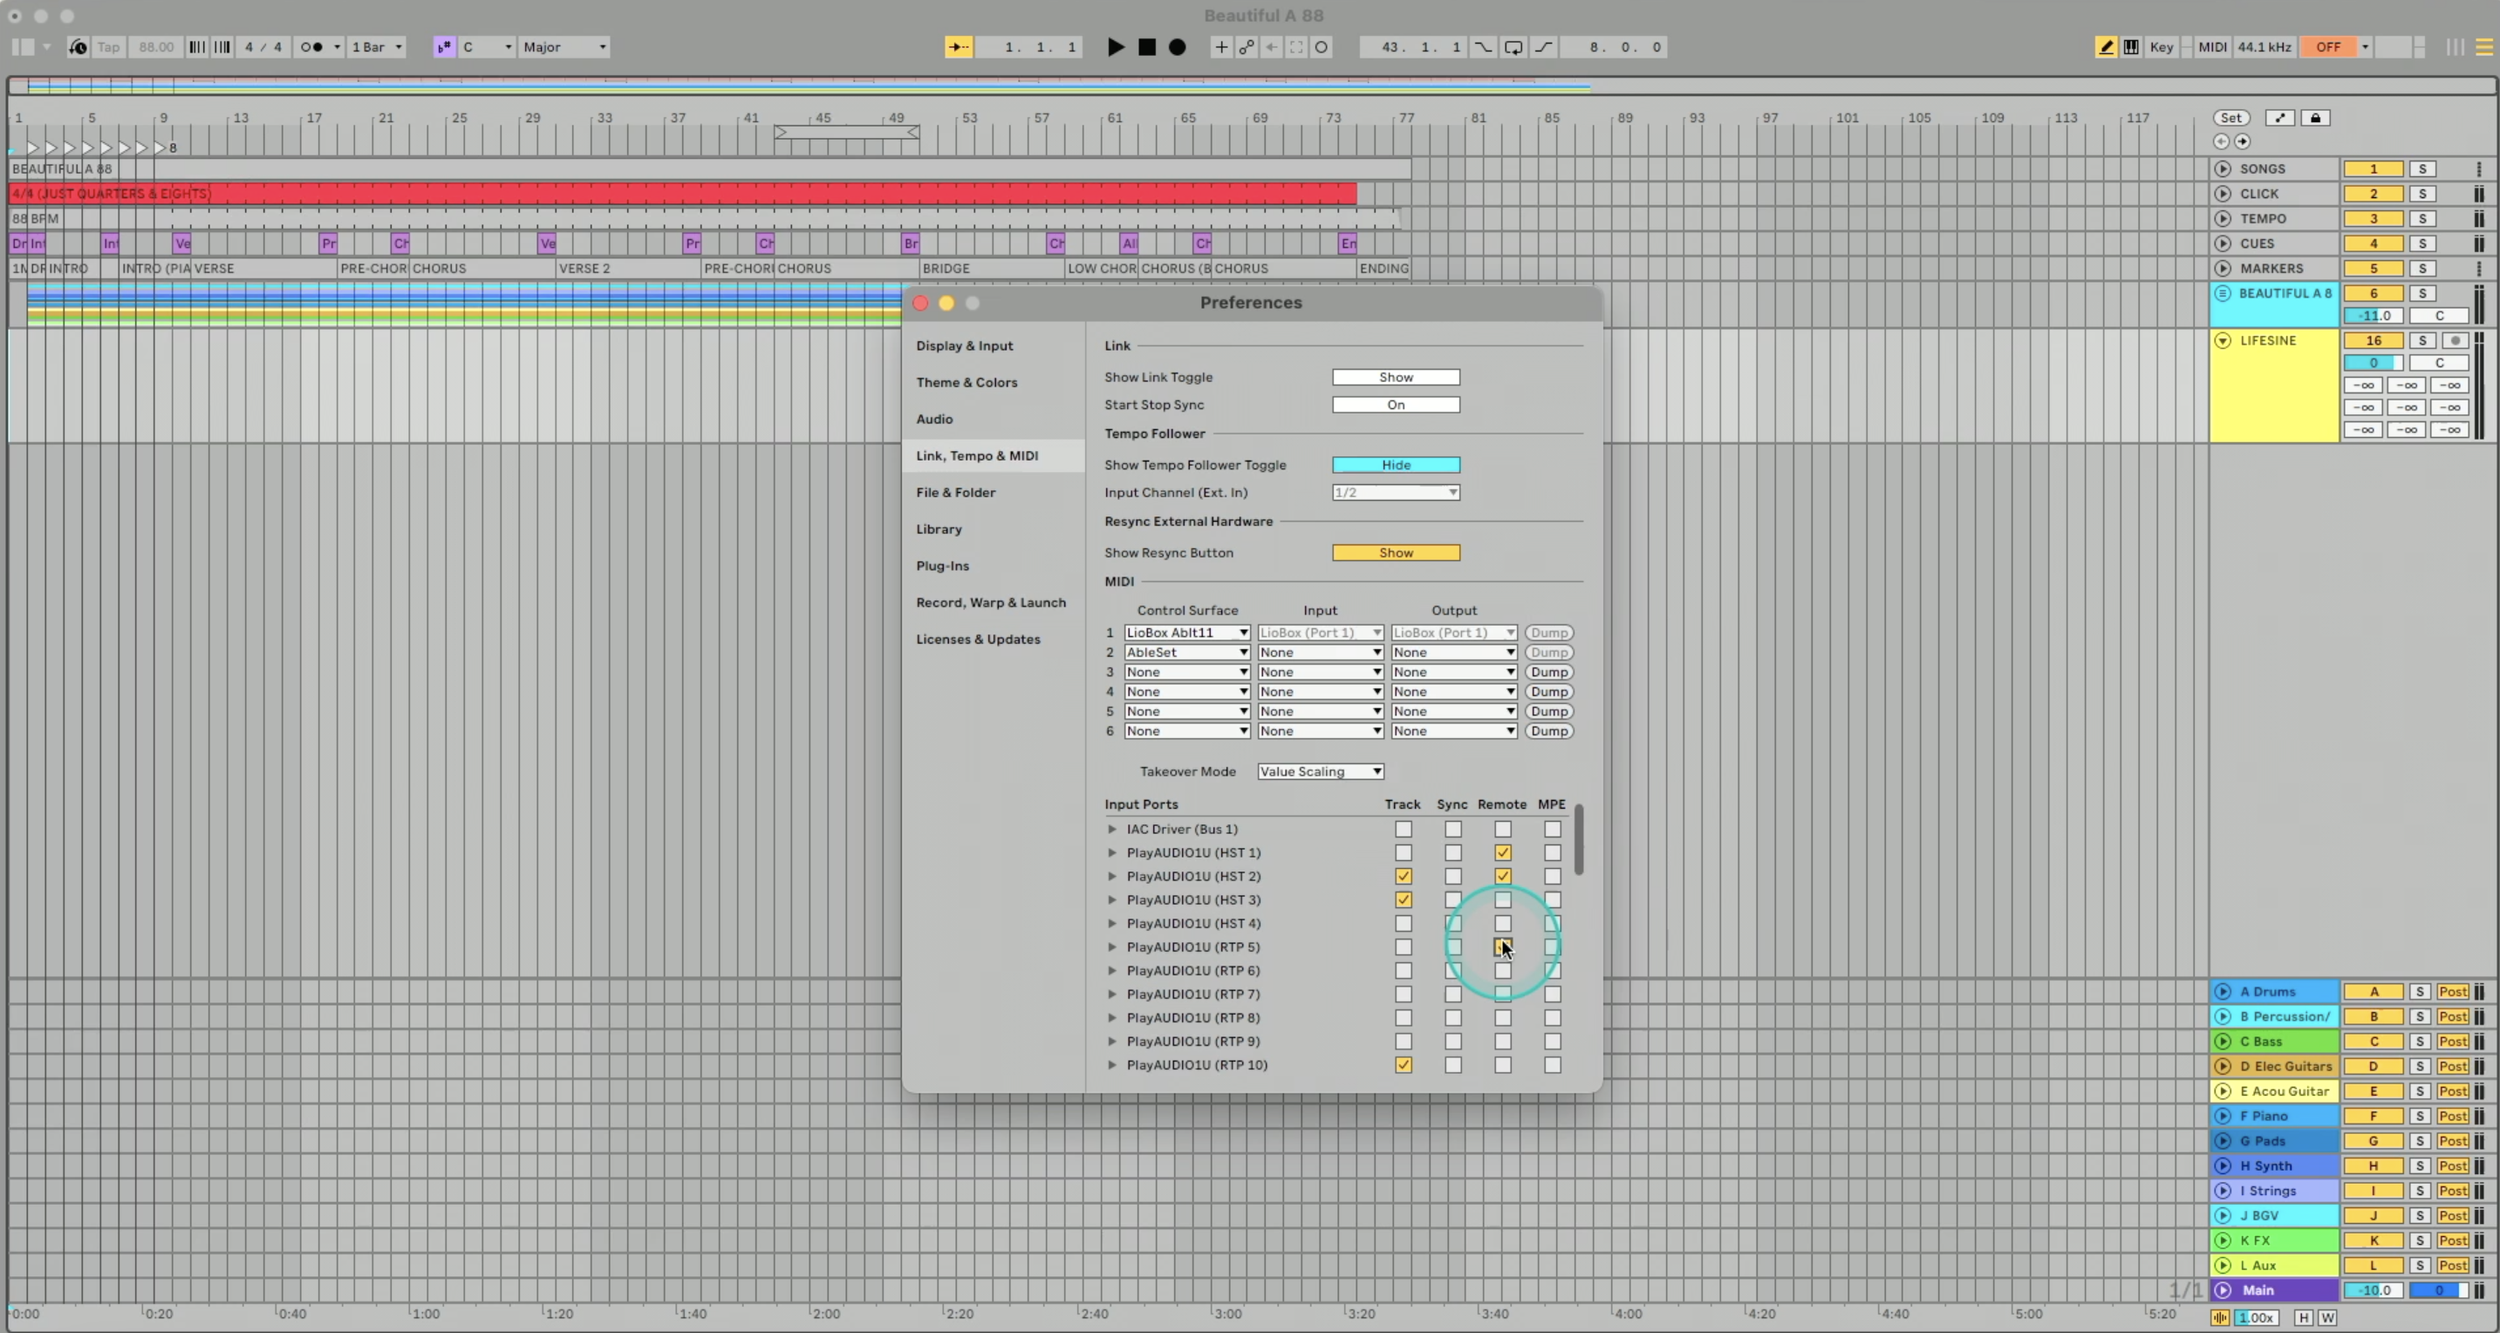
In your DAW, navigate to the MIDI preferences and enable MIDI input from the RTP 5 port. You’ll want to do this for both your A and B computers. In the example above, I’ve enabled “remote” in Ableton Live for RTP 5 on both my A and B computers.
From there you can MIDI map like normal with your MIDI controller, and get full “remote” control of your Playback Rig. from anywhere onstage!
Access From Anywhere
By adding a mioXM into your setup with your PlayAUDIO1U, you now get the ability to access your playback rig from anywhere on-stage. No more crossing your fingers every performance and hoping your setup works, you can have fully confidence everything will work, and stay focused on the music, and in the moment with only your MIDI controller on-stage.
If you need further assistance with setting up your MIDI controller or exploring the mioXM, don't hesitate to reach out to our support team at the help center for personalized guidance!
For more insights and tutorials, check out our previous articles on the iConnectivity blog.